

I am not trying to rewrite the book here, I just want to give a basic rundown on what we have found works for us. There are many factors that affect hatching such as outside humidity, breed of duck, the diet that the ducks are on, and much more that will be specific to your own location and eggs so just use this guide as a base and adjust it to your specific situation. At the end of the article are a couple links to some very helpful information about hatching.

Preparing for incubation
- The very first step in a successful hatch is to choose the right eggs. Choose a good breed for you, and locate a decent seller of eggs. Be prepared to spend months waiting on good quality eggs if that is what you want. If you’re looking for a pet and not a show bird you can be a little less picky but do still make sure that you are still receiving healthy eggs and not being scammed.
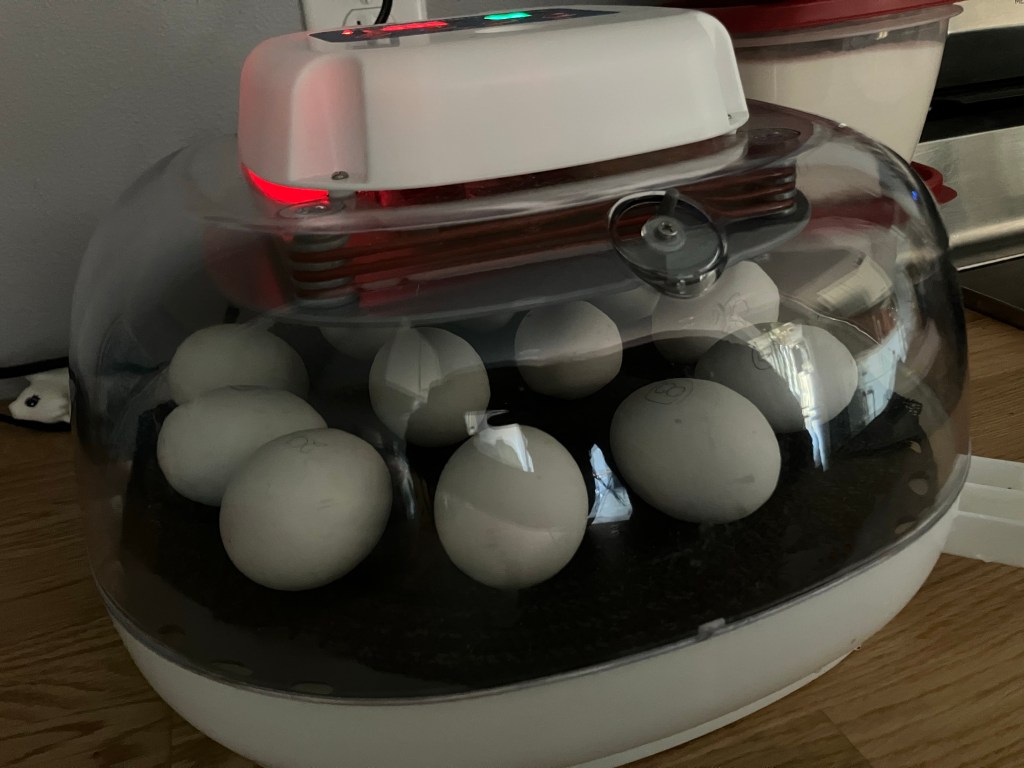
- You’ll also need to pick out and purchase an incubator. Take a look at the kinds of incubators available and find a decent one that fits your needs and has good reviews. We use the Nurture Right 360 and have found it very reliable and convenient. You’ll want to have your incubator set up and running two or three days before your eggs arrive to make sure that the new machine works properly. Putting an extra thermometer and hygrometer in the incubator assures that the readouts that the machine gives you are accurate.
- After you have received your eggs, candle each one and remove any eggs that have cracks or that have more than one yolk. If you receive an egg with a detached air sac (you’ll see an air sac that doesn’t stay in one place when you move the egg around) you can find a helpful link at the bottom of the article on what to do. For all eggs that seem well and good, place them large size (air sac) up and let them rest for 24 hours before putting them into your incubator.

Days 1-7 of incubation
- After the eggs have settled for a day or so, place them in the incubator and make sure the temperature is set at 99.5 and add water and adjust the vent to bring the humidity to between 55 and 60%.
- Immediately after setting the eggs, make a note; including the day they were set, the day they will be expected to hatch, the dates they need to be candled, and the date of their lockdown. I usually mark this on my phone calendar and on the fridge so I don’t forget. Trust me, you don’t want to forget!
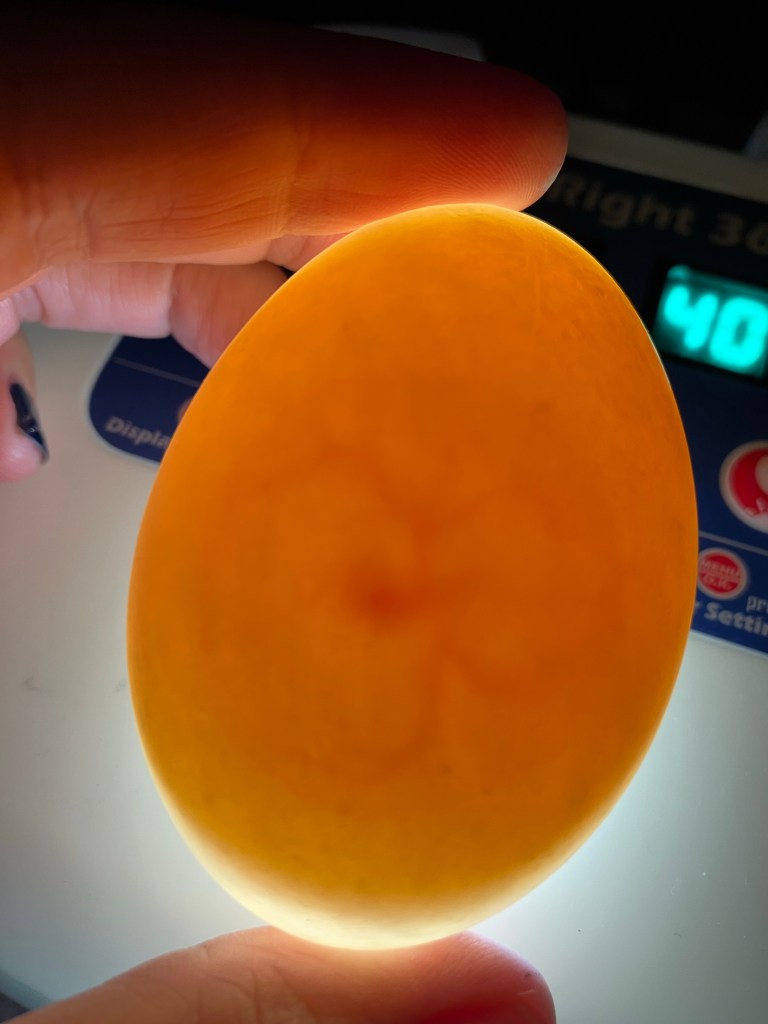
- Candle the eggs An experienced hatcher can tell if an egg is fertilized at around 4 days but most people prefer to candle their eggs at day 7. For this check you are looking for a dark spot with veins all around it. If you’re lucky you might see that dark spot beat, a baby heart beat! At this time you should remove any infertile eggs.
Days 8-14
“Always set a timer when cooling the eggs- this will save ducklings lives one day, guaranteed!!”

- On day 10, you can start cooling and misting the eggs once a day. This is supposed to simulate the mother duck getting off the nest to stretch and swim. To do this you simply remove the lid from the incubator, wait ten minutes, lightly mist the eggs, and replace the lid. Make sure that you always set yourself whatever timer you usually use to make sure that you don’t forget to put the lid back on. A one time mistake can cost a whole batch of baby ducklings so a small timer is worth the effort!
- On day 14 you can candle again. You should see veins and usually movement, but sometimes they are sleeping and don’t move so don’t depend on movement as a definite sign. Remove any eggs that have obviously stopped developing but keep any eggs you aren’t sure about. Candling eggs gets easier with experience.
Days 21-28
- On day 21 you can candle the eggs, or you can wait until lockdown day, Day 25 to do the final candle. Either way you should be looking for eggs that have mostly dark except for their air sac. Sometimes you can see veins, red shading, and movement. Those are good signs. Again check and remove any eggs that have clearly stopped developing.
- On either Day 24 or 25 stop cooling and misting and put the eggs into lockdown. For lockdown you unplug and remove the egg turner or stop turning then yourself. Raise the humidity as much as your incubator allows when properly filled with water and open the vent all the way. While I am removing the egg turner, I like to lay down a non slip pad in the incubator. That will help the ducklings learning to stand more naturally and avoid splay leg
- Days 26-31 are hatching days! Generally speaking, most ducks hatch on day 28. Muscovies are a few days longer and other breeds are a few days shorter. Also, the temperature and humidity affect if they hatch sooner or later than normal. After all the eggs have hatched I usually give any eggs I was not sure about 3 extra days before shutting down the incubator.
Hatching Days!
I have heard and read often of the distress people go through once hatching begins, all because ducks hatch really slowly. This worry seems doubly guaranteed if the person hatching the eggs has hatched chickens before hand. All this worry is over one simple fact; ducklings hatch very, very slowly. Apparently chicks just go ahead and get the job done once they start the process, and the fact that ducklings take forever could easily make a person wonder if the duckling is okay. So just remember, all ducklings hatch slowly and this is normal.

Step One
The first step in hatching (after the duckling has maneuvered itself into its hatching position) is for the duckling to internally pip. This means that they use their bill to break into the air sac and get their lungs working for the first time. This is when you can start to hear them peep at you and you can whistle back to encourage them.
Step Two
Wait. For about 24 hours, often closer to 30 in my experience. The duckling now is absorbing its yolk and getting its lungs working. The veins all around the duckling on the egg’s membrane are drying up so the duckling can break through.
Step Three
The external pip is next. Sometimes they are so big that they look like they’re trying to hatch right then. More often though, I see small cracks. They can be so small that you wonder if air itself can actually fit through the crack. Any size is perfectly fine, don’t worry!


Step Four
Wait. All that important stuff they were working on? Yeah, they are not fine with that stuff yet. They needed more air so they had to make a hole in their shell, but they are not ready for this world just yet. They need to rest 24 or more hours.

Step Five
It’s time! Now the ducklings are ready to come out and you’ll see the pip start to grow longer, and the duckling will zip. That’s when they make a line around the top of the egg so that they may pop the top off and come out. Once they start, zipping should only take up to a few hours and tada! New baby flappy feets!

Step Six
After the duckling emerges from its egg it will be exhausted and wet. Right after hatching, ducklings will lay down and rest for several minutes. It will go through cycles of trying to move and learn how their feet work and resting. During the wake phase, the duckling will learn to move, peepcheep for the other eggs and ducklings (they encourage the other eggs to hatch by doing this!), and they always give good entertainment with the things they try to eat. Their own shell, their brother’s toe, the floor mat, nothing is safe from hungry newborn duckies. During the sleep phase the duckling does just that, sleeps. At first you will have to run over and check that the duckling is still alive because they pass out in positions that are totally weird and lay almost perfectly still. After a few hours they’ll start to move around more normally and you’ll often find them cuddled up next to their hatch mates or next to an egg that hasn’t hatched yet. Warm eggs make great pillows. Leave the duckling in the incubator until it is completely dry. This is a life saving direction here folks, do not put a wet duckling in a brooder. It will get too cold!

Congratulations on your new feather puppies! Here are some of helpful links for more information.